Difference between revisions of "Calibration/ScenarioComparison/hydrology/en"
BhawaniRegmi (Talk | contribs) (→Combine Scenarios) |
BhawaniRegmi (Talk | contribs) (→Combination from Scenarios) |
||
| (3 intermediate revisions by one user not shown) | |||
| Line 1: | Line 1: | ||
== Scenario Comparison == | == Scenario Comparison == | ||
| − | = | + | = Combination from Scenarios = |
The new project structure of KalypsoHydrology from version 12 differs significantly from the earlier Kalypso versions. Instead of a ''Basic model'' and ''Calculation variants'', a project now consists of ''Scenarios'' and ''Simulations''. In contrast to the previous ''Calculation variants'', which always contained a separate copy of the model, a simulation now contains only the control parameters required for a simulation and accesses the model data of its scenario. | The new project structure of KalypsoHydrology from version 12 differs significantly from the earlier Kalypso versions. Instead of a ''Basic model'' and ''Calculation variants'', a project now consists of ''Scenarios'' and ''Simulations''. In contrast to the previous ''Calculation variants'', which always contained a separate copy of the model, a simulation now contains only the control parameters required for a simulation and accesses the model data of its scenario. | ||
| − | Due to this changed project structure, the old project cannot be executed | + | Due to this changed project structure, the old project cannot be executed automatically. |
| − | The simplest approach would be to import the previous basis model as a | + | The simplest approach would be to import the previous basis model as a base scenario, and the previous calculation variants as simulations. However, this can lead to data losses in practice, since it is not guaranteed that variants were derived from the unchanged basic model as intended. If changes were made to the variants, they would be lost in the old project simulation because the simulations do not contain a copy of the model data as before. The user must ultimately decide which model variant is to be adopted as a new basic scenario. This takes place in several steps, described in the following. |
[[File:Hydrology_Projectconversion_example.png|250px|thumb|''Example structure after the old project import'']] | [[File:Hydrology_Projectconversion_example.png|250px|thumb|''Example structure after the old project import'']] | ||
| − | First, in order to avoid data losses, independent scenarios with a simulation calculation (corresponding to the old calculation variant) are generated from the old project variants. These can (and should) be merged again after completion of the old project by the user. The user must decide which model version ( | + | First, in order to avoid data losses, independent scenarios with a simulation calculation (corresponding to the old calculation variant) are generated from the old project variants. These can (and should) be merged again after completion of the old project by the user. The user must decide which model version (i.e., which scenario created automatically from the computational variants) is to be used as the basic scenario. |
See also (see Figure [[:File:Hydrology_Projectconversion_example.png|'' Example structure after the old project import'']]). The picture shows an example, which was created from a basic model with two types of variants (called ''Long-term simulation'' and ''Short-term simulation''). These were imported as a base scenario with two sub-scenarios. Each sub-scenario contains a simulation definition of the same name. | See also (see Figure [[:File:Hydrology_Projectconversion_example.png|'' Example structure after the old project import'']]). The picture shows an example, which was created from a basic model with two types of variants (called ''Long-term simulation'' and ''Short-term simulation''). These were imported as a base scenario with two sub-scenarios. Each sub-scenario contains a simulation definition of the same name. | ||
| − | == | + | == Merge Scenarios == |
| − | [[File:Hydrology_Projectconversion_mergeScenarios_menu.png|250px|thumb|right|'' | + | [[File:Hydrology_Projectconversion_mergeScenarios_menu.png|250px|thumb|right|''Merge Scenarios'' Tool]] |
| − | When | + | When merging scenarios, the simulation definitions of one or more scenarios are transferred to a target scenario. The model data of the target scenario remains unchanged, i.e. The simulation definitions are applied to these model data. The procedure is as follows: |
Activate the ''Merge Scenarios'' tool from the scenario view context menu (see [[:File:Hydrology_Projectconversion_mergeScenarios_menu.png| ''Merge tool scenarios'']]). | Activate the ''Merge Scenarios'' tool from the scenario view context menu (see [[:File:Hydrology_Projectconversion_mergeScenarios_menu.png| ''Merge tool scenarios'']]). | ||
| Line 28: | Line 28: | ||
== Compare the scenario data == | == Compare the scenario data == | ||
| − | Before merging, the user should decide which model version ( | + | Before merging, the user should decide which model version (i.e, which scenario created automatically from the computational variants) to use, as this is used for all future simulations. To simplify the decision, an additional tool for comparing scenarios was integrated. |
To do this, several scenarios are selected in the ''Scenarios''- view and then the ''Scenarios comparison'' is started with the right mouse button. A new query window opens from which the ''Reference scenario'' is selected. Click ''OK'' to start the comparison scenario. An Excel spreadsheet with several spreadsheets opens automatically. For each sheet, the compared parameters of a group (for example Node, Strand, Inflow area, Land use, etc.) are documented per scenario. Parameters that differ from the reference scenario are marked in red. The Excel table is automatically saved in the Temp directory of the computer when it is opened. | To do this, several scenarios are selected in the ''Scenarios''- view and then the ''Scenarios comparison'' is started with the right mouse button. A new query window opens from which the ''Reference scenario'' is selected. Click ''OK'' to start the comparison scenario. An Excel spreadsheet with several spreadsheets opens automatically. For each sheet, the compared parameters of a group (for example Node, Strand, Inflow area, Land use, etc.) are documented per scenario. Parameters that differ from the reference scenario are marked in red. The Excel table is automatically saved in the Temp directory of the computer when it is opened. | ||
Latest revision as of 14:27, 18 February 2017
Contents |
[edit] Scenario Comparison
[edit] Combination from Scenarios
The new project structure of KalypsoHydrology from version 12 differs significantly from the earlier Kalypso versions. Instead of a Basic model and Calculation variants, a project now consists of Scenarios and Simulations. In contrast to the previous Calculation variants, which always contained a separate copy of the model, a simulation now contains only the control parameters required for a simulation and accesses the model data of its scenario.
Due to this changed project structure, the old project cannot be executed automatically.
The simplest approach would be to import the previous basis model as a base scenario, and the previous calculation variants as simulations. However, this can lead to data losses in practice, since it is not guaranteed that variants were derived from the unchanged basic model as intended. If changes were made to the variants, they would be lost in the old project simulation because the simulations do not contain a copy of the model data as before. The user must ultimately decide which model variant is to be adopted as a new basic scenario. This takes place in several steps, described in the following.
First, in order to avoid data losses, independent scenarios with a simulation calculation (corresponding to the old calculation variant) are generated from the old project variants. These can (and should) be merged again after completion of the old project by the user. The user must decide which model version (i.e., which scenario created automatically from the computational variants) is to be used as the basic scenario.
See also (see Figure Example structure after the old project import). The picture shows an example, which was created from a basic model with two types of variants (called Long-term simulation and Short-term simulation). These were imported as a base scenario with two sub-scenarios. Each sub-scenario contains a simulation definition of the same name.
[edit] Merge Scenarios
When merging scenarios, the simulation definitions of one or more scenarios are transferred to a target scenario. The model data of the target scenario remains unchanged, i.e. The simulation definitions are applied to these model data. The procedure is as follows:
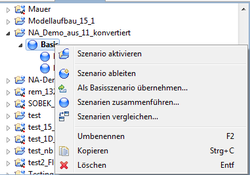
Activate the Merge Scenarios tool from the scenario view context menu (see Merge tool scenarios).
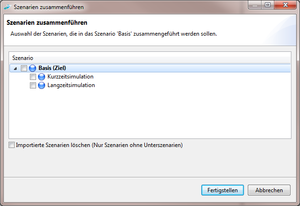
The following Dialogue is used to select the scenarios whose simulation is to be transferred to the target scenario. The target scenario is displayed in Bold and can not be selected. When the dialogue is completed, all simulation definitions in the selected scenarios are copied to the target scenario and stored there. If the original scenarios are no longer required, they can be deleted at the same time with the option Delete imported scenarios.
[edit] Compare the scenario data
Before merging, the user should decide which model version (i.e, which scenario created automatically from the computational variants) to use, as this is used for all future simulations. To simplify the decision, an additional tool for comparing scenarios was integrated.
To do this, several scenarios are selected in the Scenarios- view and then the Scenarios comparison is started with the right mouse button. A new query window opens from which the Reference scenario is selected. Click OK to start the comparison scenario. An Excel spreadsheet with several spreadsheets opens automatically. For each sheet, the compared parameters of a group (for example Node, Strand, Inflow area, Land use, etc.) are documented per scenario. Parameters that differ from the reference scenario are marked in red. The Excel table is automatically saved in the Temp directory of the computer when it is opened. After combining the scenarios, it is recommended to create an independent project from the selected scenario using the tool as the basic scenario.
| Language: | English • Deutsch |
|---|


