Difference between revisions of "NetElements/NewNetElements/hydrology/en"
(Created page with "= Creating new net elements by using functions of the modeller perspective= == change of the perspective (modeller perspective) == The creation of new net elements is a fun...") |
|||
| (2 intermediate revisions by one user not shown) | |||
| Line 7: | Line 7: | ||
== Add new net elements == | == Add new net elements == | ||
The map for adding new net elements to the model is called in the tree structure using the following path: ‘NA-Modell Name’ —> Base —> (if applicable, scenarios —> ‘Name Scenario’) —> Maps/Karten —> Modellvernetzung.gmt. | The map for adding new net elements to the model is called in the tree structure using the following path: ‘NA-Modell Name’ —> Base —> (if applicable, scenarios —> ‘Name Scenario’) —> Maps/Karten —> Modellvernetzung.gmt. | ||
| − | The procedure is shown in the figure [[:File: | + | The procedure is shown in the figure [[:File:ErstellungNetzelemente_Modellierer.jpg|''Steps to create new net elements using the modeller perspective.'']] and is explained below: |
* Step 1: Activation of the theme | * Step 1: Activation of the theme | ||
:* To create a new net element, the theme must be activated. | :* To create a new net element, the theme must be activated. | ||
| Line 17: | Line 17: | ||
The new network element is created and must be edited with data (name, link, etc) in the table view of all network elements. The table view in the modeller perspective is provided under the following path: ‘NA-Modell Name’ —> Base —> (if applicable, scenarios —> ‘Name of Scenario’) —> Tables —> Model —> Select Theme’. | The new network element is created and must be edited with data (name, link, etc) in the table view of all network elements. The table view in the modeller perspective is provided under the following path: ‘NA-Modell Name’ —> Base —> (if applicable, scenarios —> ‘Name of Scenario’) —> Tables —> Model —> Select Theme’. | ||
| − | [[File: | + | [[File:ErstellungNetzelemente_Modellierer.jpg|thumb|600px|right|Steps to create new net elements via the modeller.]] |
| − | [[Category:Hydrology | + | [[Category:Hydrology]] |
| − | {{Languages| | + | {{Languages|Contents/hydrology}} |
Latest revision as of 14:14, 15 November 2021
[edit] Creating new net elements by using functions of the modeller perspective
[edit] change of the perspective (modeller perspective)
The creation of new net elements is a function in the perspective "Kalypso Modeller". The change of perspective is explained here: Change perspective. The standard perspective is the "Kalypso Workflow", which is changed here to "Kalypso Modeller". This view displays the tree structure of the models and displays additional functions.
[edit] Add new net elements
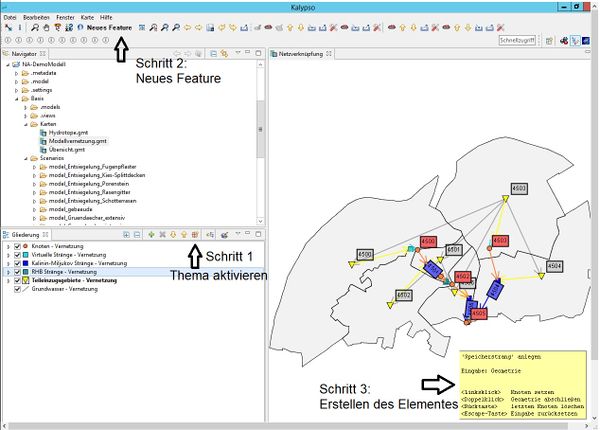
The map for adding new net elements to the model is called in the tree structure using the following path: ‘NA-Modell Name’ —> Base —> (if applicable, scenarios —> ‘Name Scenario’) —> Maps/Karten —> Modellvernetzung.gmt. The procedure is shown in the figure Steps to create new net elements using the modeller perspective. and is explained below:
- Step 1: Activation of the theme
- To create a new net element, the theme must be activated.
- Step 2: New feature
- The "New Feature" function opens an information field to specify the geometry of the element.
- Step 3: creation
- The structure points are defined by clicking on the map and is completed by double click.
The new network element is created and must be edited with data (name, link, etc) in the table view of all network elements. The table view in the modeller perspective is provided under the following path: ‘NA-Modell Name’ —> Base —> (if applicable, scenarios —> ‘Name of Scenario’) —> Tables —> Model —> Select Theme’.
| Language: | English • Deutsch |
|---|
